Monday, 27 February 2017

The Easiest Ever Pancake Recipe!

In our house we don't need an excuse like Pancake Day for us to enjoy these deliciously simple tea time or really anytime treat.

They are the perfect after school meal which is quick and filling.

Pancakes always remind me of growing up and after schools spent at my Nanny's house (which just happened to be across the road). I would walk to the bottom of the road with my grandad to collect my auntie off the school bus and we would walk back to be greeted by the lovely buttery smell of fresh pancakes - usually filled with my favourite warm strawberry jam.


These days my kids like to smother them in chocolate spread or grated cheese.


I tend to stick to the same recipe every year and just because it's easy and it works, every time.

You will need...

2 eggs
300ml of milk
100g plain flour
Butter

How to make them...

1. Pop the flour, eggs, milk into a bowl and whisk to a smooth batter. 

2. Grab your frying pan and heat over a medium heat and add a small knob of butter. Once it starts to melt tilt it around the pan. Now add some pancake mix to the pan and swirl around. Cook your pancakes for about 45 seconds -  1 min on each side until golden.

3. Serve with whatever you fancy whether it's sugar and lemon, ham and grated cheese or chocoate spread and golden syrup!

Make sure you get your camera out and capture those happy faces as they tuck into their pancakes!

Nathalie 
x

SHARE:

Saturday, 25 February 2017

Cheats Bourbon Biscuit Brownies....

There is no escaping it. I love a Bourbon biscuit. Some might argue that it's not up there with your HobNobs and your chocolate digestive but I do love a good cheap biscuit. A school coffee morning biscuit. It's there mixing with the custard creams of the world and it is holding its own.

I love baking and I love anything where someone has taken the time to bake something but I am also realistic that we don't always have all the time in the world or the ingredients which is why I love having a few packet mixes stashed in the cupboard ready for me to knock something lovely up if the kids fancy sweet or someone decides to pop round on the hop.

Let me introduce you to the easiest and show stopping cheats bake. The Cheats Bourbon Biscuit Brownies. Perfect for school cake sales and a weekend cuppa and it's so easy that even the most novices of bakers can knock these up!

It's the mix of gooey brownie with a crunchie biscuit which makes my Cheats Bourbon Biscuit Brownies to die for!!


You will need...


1 x packet of Betty Crocker Chocolate Fudge Brownie Mix
1 x egg
Water
Vegetable Oil
A packet of Bourbon bisucits

How to make it...

1. Start by heating your oven to 180 degrees / 170 degrees fan.

2. Line a brownie tin or a rectangular tin with baking paper.

3. Place the Bourbon biscuits in the bottom of the tin.


4. Make up the brownie mix as per the packets instructions.

5. Spread the brownie mixture over the biscuits.

6. Place into the oven and bake for approx 60 minutes (it takes far longer as the heat has to go through the biscuits before reaching the brownie batter).

7. Remove from the oven and allow to cool thoroughly.

8. Once cooled, turn out onto a board so that the Bourbon biscuits are facing you and cut into either twos or fingers of one biscuit.


9. Enjoy!

Now, this is a bake that looks sooooo much more than a packet mix and just takes it to the next level!

Let me know if you make it!

Nathalie x
SHARE:

Thursday, 23 February 2017

The Ultimate Creme Egg Rocky Road...

As you know I LOVE a Cadbury Creme Egg - in fact I probably love them a little too much so when I saw a recipe containing biscuits, marshmallows, Creme Eggs AND Mini Eggs I might have wooped for joy a little.

Let me introduce you to The Ultimate Creme Egg Rocky Road! It's also sooooo easy to make too! I made these for my school bake sale today and they went down a storm so I shall definitely be making these again!!


What you will need...

150g butter
250g dark chocolate
150g milk chocolate
60ml golden syrup
150g digestive biscuits (you could really use any biscuits)
100g pink and white marshmallows
80g Mini Eggs
8 x mini Cadbury Creme Eggs
6 x Regular size Cadbury Creme Eggs
100g White Chocolate
1 x tube of yellow colouring paste
1/2 tbsp vegetable oil

How To Make It...

1. Start by placing your regular Creme Eggs in the fridge (this will help when cutting them later)

2. In a bowl over a pan of simmering water melt your butter, dark chocolate, milk chocolate and golden syrup.

3. Place your biscuits in to a large sandwich bag and give them a good old bash until they have broken up but are not reduced to just crumbs. 

4. Once the chocolate mix has melted remove from the heat and stir it the marshmallows, biscuits, mini creme eggs and mini eggs and give a jolly good stir. 

5. Tip your chocolate mix into a lined tin. 

6. In a separate bowl break up the white chocolate and melt over a pan of simmering water as before. 

7. Once the white chocolate has melted stir in the yellow colouring. This will cause the chocolate to seize but by simply adding a little vegetable oil this will thin it out. Drizzle the yellowy white chocolate over the chocolate mix in the tin. 

8. Remove the Creme Eggs from the fridge and slice length ways in half. Place the halves on top of the chocolate mix. 

9. Pop the mixture in the fridge to harden up for at least an hour and a half. 

10. Slice up into big fat slabs and enjoy!! 


Enjoy!

Nathalie x
SHARE:

Sunday, 19 February 2017

Oh Hello Fresh!

A couple of weeks ago we were kindly contacted by those friendly folk at Hello Fresh who asked if we would like to try out their Family Box for a week to see what we thought.

Well why not!

Hello Fresh want to bring fresh wholesome ingredients direct to your door with easy to read recipes that accompany their easy to cook recipes.

Hello Fresh will individually bag up all your ingredients in recyclable brown bags with the exact amount needed for each recipe. Each box of food is delivered with insulated wool bags (we chucked ours on the compost) and reusable ice packs (perfect for a picnic in Summer) and i'm not sure what time our box was delivered as I was out but by the time I had unpacked the food it was still very cold.


Tom is a big eater and one thing that has always put me doing one of these subscription boxes is that I know he will whinge over how small the portion size is. Well with Hello Fresh we had NO complaints - in fact the only complaint would be that the portion sizes for a family (4 people) were probably a bit big for our family of 2 adults and 2 children - but this is a minor thing and one reason why I would use them again because we felt with each meal we got value for money.

All the produce in the boxes was very fresh and looked incredibly appetising even in its uncooked state! The below box was all the ingredients for four meals for four people.


Now, Hector will eat just about anything but Charlie is one fussy little thing so I was unsure how gnocchi bolognese and feta and leek topped chicken would go down but given he polished off all his meals we had no issue!


The Gnocchi Bolognese With Cheesy Broccoli was amazing!!!

Each of the recipes comes with very clear recipe cards that talk through step by step just how to achieve that meal.


One thing that I loved about the box was the fact that I was cooking really exciting new dishes from scratch. Every meal we had was delicious and there was not one which I thought "hmmm not sure about this".

I was sent four recipes that were already pre selected for me but now having had two further boxes and downloaded the app I can pick the recipes I would like in my box and for the last two weeks we have continued to have some really delicious family meals that have pushed our taste buds out of the box.

So, would I have it again? Yes! For us a family of four the last couple of weeks I have paid £64 for four four person meals - that has reduced my weekly shopping bill dramatically having only had top up for things like loo roll, milk, tea, bread etc. I love the variety of the recipes. I love the way that I am creating great family meals without really having to think about it.

Hello Fresh you've converted us - looking forward to Monday's box!

Bon Apetit!

Nathalie x


SHARE:

Saturday, 18 February 2017

The Easiest Ever White Chocolate Easter Cheesecake...

No I don't know about you but I love a cheesecake and when my friend Zoe made us a white chocolate cheesecake one day for pudding I was hooked!!

For me Easter is all about the chocolate. It's a time for eating too much of it and quite frankly if it does not come adorned with Cadbury Creme Eggs and Mini Eggs I simply do not want to know!

One top tip is to purchase Mini Eggs and Creme Eggs when you see them regardless how long it is till Easter. Every single year for the last goodness knows how long I have gone in search of these Easter weekend and failed so stock up when you can!!

This recipe is simply the easiest ever white chocolate cheesecake. And it's also not just for Easter. We've had it topped with fruit and simply on its own. It's very sweet so if you are more partial to a slice of Brie than you are cheesecake step away now - equally so if you are trying to lose weight you won't want to read on!!


So, here's how you make it.

What you'll need....

350g Digestive biscuits
75g melted butter
480g white chocolate (I used Milkybar)
300ml double cream
280g full fat cream cheese (I would recommend Philadelphia over the supermarket own brands)
250g mascarpone


How to make it...

1. Start by turning your digestive biscuits into fine crumbs. You can use a food processor for speed but I popped mine in a large sandwich bag and gave it a jolly good battering using a rolling pin.

2. Place the butter in a saucepan and melt.

3. Line a spring release baking tin with baking paper (this is not really necessary but saves on the washing up)

4. Tip the biscuit crumbs into a bowl, add the melted butter and mix.

5. Tip the crumb mixture into the tin, level and press down with the back of a spoon.

6. Pop into the fridge for 30 minutes.

7. Meanwhile let's get on with the good stuff. Break up your white chocolate and place in a heat resistant bowl over a pan of simmering water. Make sure that the water does not touch the bowl and once the chocolate starts to melt give it a mix and take off the heat until it has all melted. Set aside to cool for 5 -10 minutes.

8. Now using a spoon or electric whisk, whisk the mascarpone and cream cheese together until smooth. Now add the double cream and whisk away for 30 seconds or until just combined.

9. Add your melted chocolate.

10. Whisk for a further 30 or so seconds.

11. Empty the chocolate cheesecake mix onto the top of your biscuit base and level out and place in the fridge for as long as possible. Feel free to lick the bowl and spoon at this point!

12. Once the cheesecake has hardened up (it will still be relatively soft to the touch) its now time to decorate. I used a selection of Mini Eggs, Creme Eggs, Malteserbunnies and melted chocolate but you can decorate it as much or as little as you like.

13. Once ready to serve remove the outer rim of the spring release tin and transfer to a plate or cake stand.

14. Cut yourself a massive slice and enjoy every mouthful!


Happy cheesecaking! I would love to see some of your cheesecake creations!

Nathalie x
SHARE:

Friday, 17 February 2017

My Baby Might Not Have Come Out Of My Vagina But I Have Still Given Birth!!!!

Last night I was happily splish splashing around in my bath whist trawling Instagram and twitter passing the time - this is my relaxation time. I love reading peoples comments on posts and photos and seeing that actually hang on... wait for it.... wow some women are really bitchy!!!


There was a photo of a woman bearing her c-section scare. It was a pretty fabulous photo and one that I could fully relate to having had to births by c-section. I was scrolling through all the lovely comments when I saw this...


I'm sorry WHAT?!? "You wouldn't really know what it's like to give birth, you only had a c-section...". Well there was only two explanations for such a ridiculous comment 1) she was clearly still high from the gas and air or b) she was just flipping ignorant. I'd like to put money on it being the latter.

I get that in society we still like to do things the way things should be done, and yes our bodies are supposed to give birth naturally (it's part of how we are made) but more often than not (over half my NCT group had c-sections) sometimes nature lets us down and medical interventions have to step in for the safety of both mother and baby, but really even in 2017 when a c-section is medically necessary women still experience judgement and quite simply pig ignorance.

To have a c-section is one that is not taken lightly and one that requires A LOT of thought and more often than not you simply do not have the time to think about it and you think about your baby and you and you do what is best. Yes I suppose it's easier to just have the pain relief and have all the hard work taken away from you (pushing, pooing, back to back etc) I will give you that but no one not anyone can prepare you for the after math of a c-section and one that I went into with very rose tinted glasses.

When I was told at 36 weeks that my first baby Charlie was breech and that a c-section was scheduled for 39 weeks I was gutted. I cried a lot. I had prepped so much for this birth that would now simply not happen. Birthing yoga. Bouncing for hours on a birthing ball to get baby to change position knowing in the back in my mind maybe that would help. I was gutted. After the initial disappointment died down I changed my mind set into planned c-section mode, well, after all if it was going to be this cool, calm and planned affair I would be going into it with nicely washed hair, a cracking bikini wax and the latest OPI polish on my tooties. Sadly this was not to be the case and when I went into labour at 36 weeks completely unprepared and without a baby bag I was petrified. First my birthing plan had gone down the swanny and now my relaxed c-section with baby being born to Take That's Greatest Day was going tits up too. Bloody marvellous.

Looking calm but ten minutes before this I threw a totally paddy and tried to make Tom take me home. 

I was frightened. Really frightened. All of my control had been handed over to a specialist surgeon and an anaesthetist called Bob who was going to effectively temporarily paralyse me from my boobs down and yet still wanted to carry out a conversation about what I had for dinner. If there was ever a time to freak out this was it. To a mother giving birth naturally the control to a certain extent is in your hands. You call the shots. When you got to push you push and you push with every single inch of your body to deliver your baby and when you do you feel like the most amazing woman in the world, and rightly so, because you are amazing, but please don't take that amazing feeling away from mothers like me who have not experienced the feeling of pushing their baby out but who still feel pretty darn amazing because like you they too grew a baby and like you too they gave birth.


Well, I tell you what, I'll see your baby being pushed out of your vagina top trumps card and I raise you the pain of the 24 hours after birth. I wonder if you ever gave any consideration to the woman lying in the bed across the ward from you who too has a new born baby in her clear plastic crib, you know that woman who has to call for the midwife each time her baby cries when you said she didn't really know what it was like to give birth. That woman who has to have a midwife hand her her baby to help her breast or bottle feed and that woman who will probably have to hand her baby back after ten minutes because no matter how many pills she pops the pain is really quite sickening just from resting her tiny 7lb baby on her belly. That woman who has to be aided by a midwife or her partner just to sit up in bed. That woman who has a bag full of urine proudly on display by her bed and that woman who has probably cried because it hurts so much to even cough. You know that woman who has just given birth too.


So, yes I may not have know the pain that it feels to push a baby's head out of the equivalent of a Dairylea cheese lid (one of the main memories of NCT was that little fact that will forever haunt me). I don't know what it feels like to have an entire human being come out of my vagina but as far as I was aware medically there are only two ways of giving birth, naturally via your vagina or via caesarean section and I HAVE GIVEN BIRTH. So what exactly is the point that women like the mother on Instagram and women all over the world who feel the need to comment and shame women who give birth via c-section trying to make?

I watched a lot of new mothers leave Guildford and Epsom hospital in the days after I gave birth. Some left after half a day and some like me stayed for 5 days but one thing I know for sure is that the NHS were definitely not giving those women who had given birth naturally a badge saying "I did it naturally".

The NHS do not hand out "I did it naturally" badges. FACT.

So to all you mothers out there who have given birth via c-section let me from one c-section mother to another a mighty high five. You are amazing. You grew a human being in your body. You kept that human being warm, safe and loved for nine months. You made sacrifices and to this day still make sacrifices for your child. You are phenomenal.

All mothers are regardless of how they birthed their baby are amazing. Women more than ever now need to stick together to stop this utter ridiculousness. Stop the body shaming, stop the name calling, stop the judgemental looks, we are all mothers just trying to raise the future generations, doing what we think is best and we are all amazing. Some of us might just have less issues weeing than you that's all - he he!

Have you received comments on the way you gave birth? Did you give them a piece of your mind or are you one of those mothers who feels they need to give birth naturally in order to feel that they have given birth? I would love to hear from you.


Nathalie x

SHARE:

Thursday, 16 February 2017

Ten Time Saving Tips For Working Parents...

So, I am finally on half term having had my first half a term at my new school and new job! I am loving it but going back to work five days a week (albeit only term time) has hit me like a steam train.

For someone who I always thought was relatively organised I've learnt that actually I am pretty pants at it. By week three my house resembled a bomb site and I had run out of knickers - emergency call to Mother to help me do the washing!!

Before when I was only working part time I was cool, calm and collected and organised and now I'm a 5 day a week worker with no knickers and I'm finding myself in situations that quite frankly at nearly 33 I should not be in - I ran out of gin last week - how, how did I get myself into that situation?!?

Over the last couple of weeks I have been jotting down ways in which I can restore some order to Chateau Webb as well as restoring my sanity!

So, here are my top tips for saving time as a working mum (or dad!):


1. Lay out everyones clothes that you are responsible for the night before. In my case this is Charlie, Hector and me!

2. Charlie attends quite a few activities outside of his school timetable each of which have different uniforms and at the beginning of each week I put those outfits in large sandwich bags in his bottom drawer that I can quickly get out the night before each activity.

3. I am slowly getting into the habit of doing one wash and one tumble dry fold per day and this is avoiding the inevitable laundrette role play scene that often occurs on a Sunday in our house.

I need to avoid situations like THIS!

4. Menu plan - I have always been a big fan of these but none more so than now with less time on my hands.

I love my fridge planner from Fox and Moon - here

5. Wash and blow dry my hair the night before. My hair takes an age to dry and given I am always short for time in the morning doing it the evening before banks me those precious extra minutes!

6. Bag up brioches! In the morning I have sandwich bags of individual brioches ready to hand out to the troops to keep their tummies ticking over before breakfast club which saves me faffing over cereal at 7.05am.

7. Outsource the ironing. I have ditched the cleaner as we did not have the disposable income anymore but one thing I have done is find a seriously great lady who helps me with my ironing and once or twice a week she gets a HUGE basket of my ironing and for the cost of a bottle of wine per week turns it around really quickly which saves me three million hours given I cannot iron!!

8. Wash the bath/shower everyday! I love Viakal and Method cleaning products so each time I have a bath or shower I spend a couple of minutes wiping down the bathroom surfaces and shower screen which means I avoid that hideous deep clean that can build up over time.

9. Invest in a great coffee machine. Simply taking your homemade latte in a flask to work will save you ££ and minutes on your morning commute.

10. Spend some time  at the weekend making a cracking Spotify playlist full of tracks that put you in an upbeat mood and whack that on first thing in the morning, in the car, on the train and put yourself in a great mood ready for the day ahead!

What tips do you have to save time, money and sanity as a parent? I would love to hear!

Nathalie x
SHARE:

Wednesday, 15 February 2017

Refurb Your Ikea Play Kitchen For Under £30 - Part Two...

So, as you know earlier in the week I embarked on my half term challenge of refurbing the kids Ikea play kitchen.


Stage one was turning the plain white back to a chalk board ready for whatever the boys wanted it to be.

Play cafe by day....

Mrs Webb's Gin Bar by night!

Well last night Webbo embarked on the final stage of the refurb - painting and new work tops!

Let me remind you what the kitchen looked like BEFORE...

Ikea Play Kitchen available to purchase here

Ok so here's how we jazzed up our little kitchen....

What you will need...

- Paint colour of your choice (we used left over paint from our kitchen which was a Valspar paint from B&Q) - a small pot will be more than enough.

- Masking tape

- Sticky self adhesive film - we used this which is available from Wilkos

- A craft knife / Stanley knife

- Sandpaper

How you do it...

1. First start by taking the kitchen apart. Top cupboard off, work top off (popping the oven and sink out), tap and handles.


2. Mask up all the areas you don't want painted. In our case we did windows, black board.

3. Lightly sand the surfaces down with the sand paper.


4. Give all the areas you want painted a first coat of paint and allow to dry for at least an hour.

5. Whilst the first coat is drying move on to your work top. Roll out your deco plastic and place the work top on top and using the stanley knife gently cut out a template allowing at least 1/2cm around each opening (hob, sink) to allow it to be wrapped around so it were.


6. Remove the backing paper of your deco paper and place on top of work top smoothing out all the air bubbles. This is fiddly but stick with it!!


7. Once your first coat is done reapply the paint for a second coat and leave to dry over night.

8. Once it is firmly dry reassemble the kitchen and pop back in the hob and sink.


Ta da! You've just refurbished your Ikea play kitchen for under £30 and given it a new lease of life!!

Would love to see pics of your kitchen creations!

Nathalie x
SHARE:

Monday, 13 February 2017

Refurb Your Ikea Play Kitchen For Under £30 - Part One...

When we moved house last year a lot of stuff went into the shed for storage. Preloved toys that Hector simply was not old enough for, stashes of clothes and Charlie's much loved Ikea play kitchen that we had purchased when he was 18 months old.

These kitchens like many things from Ikea are reasonably priced - £59 - and given they are flat packed seem to last the test of time - most families with children under 5 will have had this one or a play kitchen of some sort.


The one that we had seen had seen some serious play and was starting to look a bit ropey. I dragged it out in January after the Christmas tree had gone and gave it a polish up and Hector has loved playing with it.

Now it's half term I have embarked on stage one of its refurbishment. Given that the kitchen is in our lounge and is a fairly large bit of kit I wanted it to fit with the decor of the room.

The end result I hope will look like a minature version of my own kitchen. Grey doors with a white marble effect work top.

The beauty of these play kitchens is that they have a blank back which if given an hour can turn this play kitchen into a whole new level of role play to whatever your child wants it to be.

Here I will show you how I created a chalk board effect on the back for under £15...

What you will need...

1. An Ikea play kitchen

2. A tin of chalk board paint (we got ours from B&Q)

3. A paint brush

4. Some masking tape

5. Chalksticks

Method...

1. Mask up the areas of wood at the back of the kitchen so that when you paint it does not mark the wood.


2. Use your chalk board paint to paint a smooth thin layer to the white areas.


3. Once the first coat is done leave to dry for at least an hour.


4. After an hour or so repeat step 3.

5. Once you have allowed the paint to fully dry peel off the masking tape.

6. Take your chalk sticks and get creative - this afternoon we set up a pop up cafe!!


The beauty of the blackboard area is that it can be whatever your imagination wants it to be!

Hector and Charlie have loved playing in the cafe this afternoon and as you can see it's Cobham's newest hangout!

Would love to see your play kitchens!

Nathalie x
SHARE:

Sunday, 12 February 2017

Let's Talk About Baby Led Weaning!

I am still somewhat in denial that my little baby will be turning two in May, I just want the days to slow down a wee bit.


I have been blessed second time around with a very easy baby in contrast to Charlie, who no fault of his own (being born with a hearing defect) was a challenging baby, was a fussy eater and a really terrible sleeper. Hector sleeps solidly from 12/12.30 - 2pm and 6.30am - 7.30am most days and we know if he's up then something is on the horizon but there is always one thing that people comment on and that's how good an eater is. I personally put that down to one thing. Baby Led Weaning (BLW).

With Charlie I was so keen for him to progress to the next stage, when he was crawling, I wanted him walking and this applied to feeding too and I took the personal decision to wean him at just four months.


Second time around with Hector and keen for time to slow down Tom and I decided that we would wait to wean. It was only at about six and a half months that we made the leap into BLW after a bit of research and a demanding toddler on my hands and an impending return to work that we knew this would work best for our family and we were willing to give it a shot. It was the best decision we have made in regards to feeding.


I purchased the Gill Rapley book and read it cover to cover. I watched out for the signs, an interest in food, trying to reach for food etc and once we started we never looked back.

Baby-led weaning is in its simplest form letting your baby eat their own food rather than you spoon feeding them. You cut food, normally what you are eating, into sizes and shapes that they can hold and eventually feed themselves, simple as that really. 


I think the major difference between baby led weaning and dare I say it, spoon fed weaning is the order in which a child learns to eat. With a spoon fed baby they learn by swallowing first and chewing later and with baby led weaning its the opposite with learning to chew first.

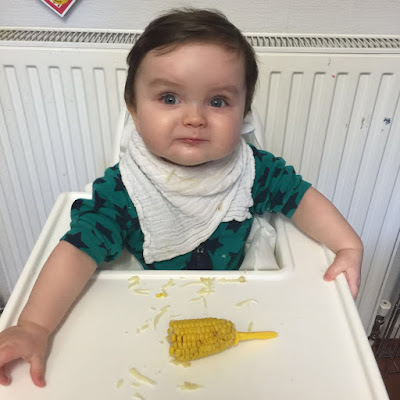
Be prepared though - baby led weaning is not for the clean and neat freak - things get messy. Very messy. Don't stress but rather simply sit back and watch your baby learn to explore the different textures, look, tastes of each new food that you introduce them to.


Hector spent most days learning to eat in very little clothing!

Well, if you are interested in trying out baby led weaning with your little one here are my top tips!

1. Have a look on You Tube for baby led weaning babies - see how they are interacting from such a young age with all manner of different foods, flavours and textures and not a puree in sight!


2. Don't get disheartened when the majority of the food that you give them goes all down them and on the floor - simply remember that "Food before one is just for fun" as your little one will still be getting the majority of their "food from milk".


3. Choose foods that have a natural handle - brocolli (tenderstem is ideal!), chicken drumsticks (skin removed), melon fingers, toast soldiers, cheese sticks, cucumber sticks (fab when teething!) are all super to give your little ones.

4. Choose a highchair that is wipe clean! This is a must! Something preferably without straps as they get grubby and manky very quickly! Might I suggest a wipe clean table cloth underneath too if you have carpet!


5. Give them what you are having. Don't bother going to great efforts to make them something worthy of a Masterchef final because they will quickly reject it and ignore it faster than John Torrode ever could and it is soul destroying. The whole beauty of baby led weaning is that baby eats what the rest of the family eat. Just bear in mind that when you are cooking to leave out the salt!

6. Don't bother with bowls - its amazing how far a plastic bowl or plate can be flung across the room. Simply use the tray - but don't pack the highchair table out with loads of food just simply pop a few bits down and let baby get stuck in.

6 months old and destroying a lamb chop!

7. Gagging. Oh how babies love to gag and as parents we love to panic - but wait! Their bodies are designed to have a gag reflex further forward so don't stress if they start gagging when they start baby led weaning  don't panic its just baby's way of moving the food around its mouth so just keep a close watchful eye when baby eats and monitor the situation and allow babies body to cough up and correct what he needs to. Never put food in baby's mouth remember to let baby lead the eating.

8. Baby poo - it will rapidly start to change and it's amazing what little gems come back to life in baby's poo - raisins will amaze you!!

9. Get your camera ready and prepare to be amazed at the foods that if they are given the opportunity they will eat, suck and chew - it's really quite marvellous.


10. Enjoy it. There really is not anything more wonderful than watching your child take their next steps in to the world of food and just think you may just be raising the future Jamie Oliver or Nigella Lawson. How fab would that be?


Did you do baby led weaning with your little one? Would love to know how they are now as an eater. Do they eat and try everything or are they super picky?

Nathalie
x


SHARE:
Blogger Template Created by pipdig